

Have you been wanting to try video but are intimidated by making long IGTV videos or YouTube videos? I know exactly how you feel. And this is why I'm so excited for Instagram Reels to be out.
I remember when I got started with video content. I was a shy social media manager used to being behind the scenes. But I was never in front of the camera. Going from 0 to 1+ minute long videos was hard.
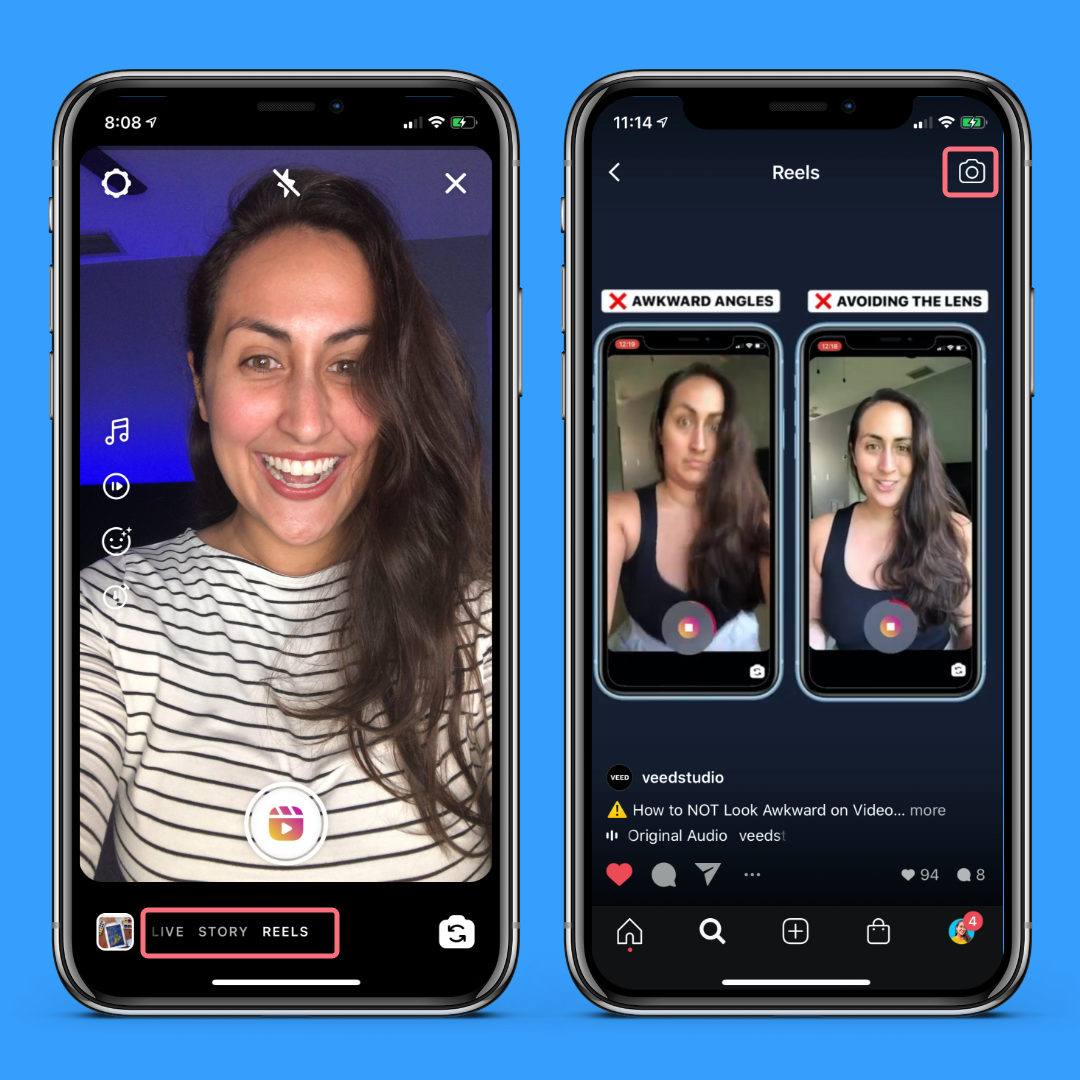
There was even one Instagram follower who pointed out my awkward shifty eyes. I didn't know looking into the lens was a best practice back then. But with time and lots of practice I've mastered being on camera.
And from being on camera so much, I've been able to grow not just my personal social media accounts to 11.8K engaged fans on both Instagram and TikTok but also repeat my success with VEED.
This is why I'm excited to break it down in simple terms and teach you the following from real experience with video marketing:
- What are Instagram Reels and why do they matter?
- How to locate and navigate Instagram Reels inside the app
- How to make your first Reel (even if you don't show your face on camera)
- How to find winning topics to make a Reel from (or repurpose content)
- Frequently asked questions about Reels (you asked, we answered)
What Are Reels & Why Do They Matter
You've probably heard that Reels are the same thing as TikTok. It's true. Just like Instagram copied Snapchat for Instagram Stories, it's doing the same with TikTok.
In case you're not familiar with TikTok, I'll break it down some more.
Reels are 15-second Instagram videos that educate, entertain, or inspire people. If you use Instagram Stories, they're basically stories with extra layers of customization. Personally, I like to call them Instagram Stories on steroids.?
But here's why I'm a big fan of them for video content beginners...
Instagram Reels are the training wheels on a bike of video content. They're short and sweet making it less uncomfortable to tackle. And since you can also do voiceovers, it's an easy way to show up with video content without having to be on camera right away (although I highly recommend doing it like ripping off a bandaid).
But also – here's something interesting to think about – Reels are a powerful form of video content appealing to the decreasing human attention span. Did you know a goldfish has a 9 second attention span and humans have an 8 second attention span?
Crazy right?!
.
.
.
Wait...what were we talking about? ?
Short-form video is on the rise. And from what we have been testing on our own account and personal accounts, the Instagram algorithm is being generous with the organic reach. Therefore engagement is on the rise. More comments, more shares, more saves, and more follows for the win!
How to Use Reels
Before we dig in how to make a Reel, let's talk about how to even find them and what all the buttons do. Don't worry, I got you.
How to Find Instagram Reels Inside the Instagram App
Alright, so I'm not gonna lie, Instagram does need to step it up and make it easier to find Reels. Unlike TikTok where you enter the app and can immediately begin consuming videos and just scrolling down, Instagram makes it a bit difficult.
To start watching Instagram Reels:
Go to the Instagram explore page. To do this, click on the magnifying glass. You can then click on the top video to start watching and scrolling.
To start making Instagram Reels:
Swipe left on the Instagram home screen as if you were going to make a story. Then click on Reels on the far right of the bottom menu where the options to go live, make a story, or make Reels appears.
What Do The Buttons on Instagram Reels Do?
Buttons That Appear Before Clicking Record
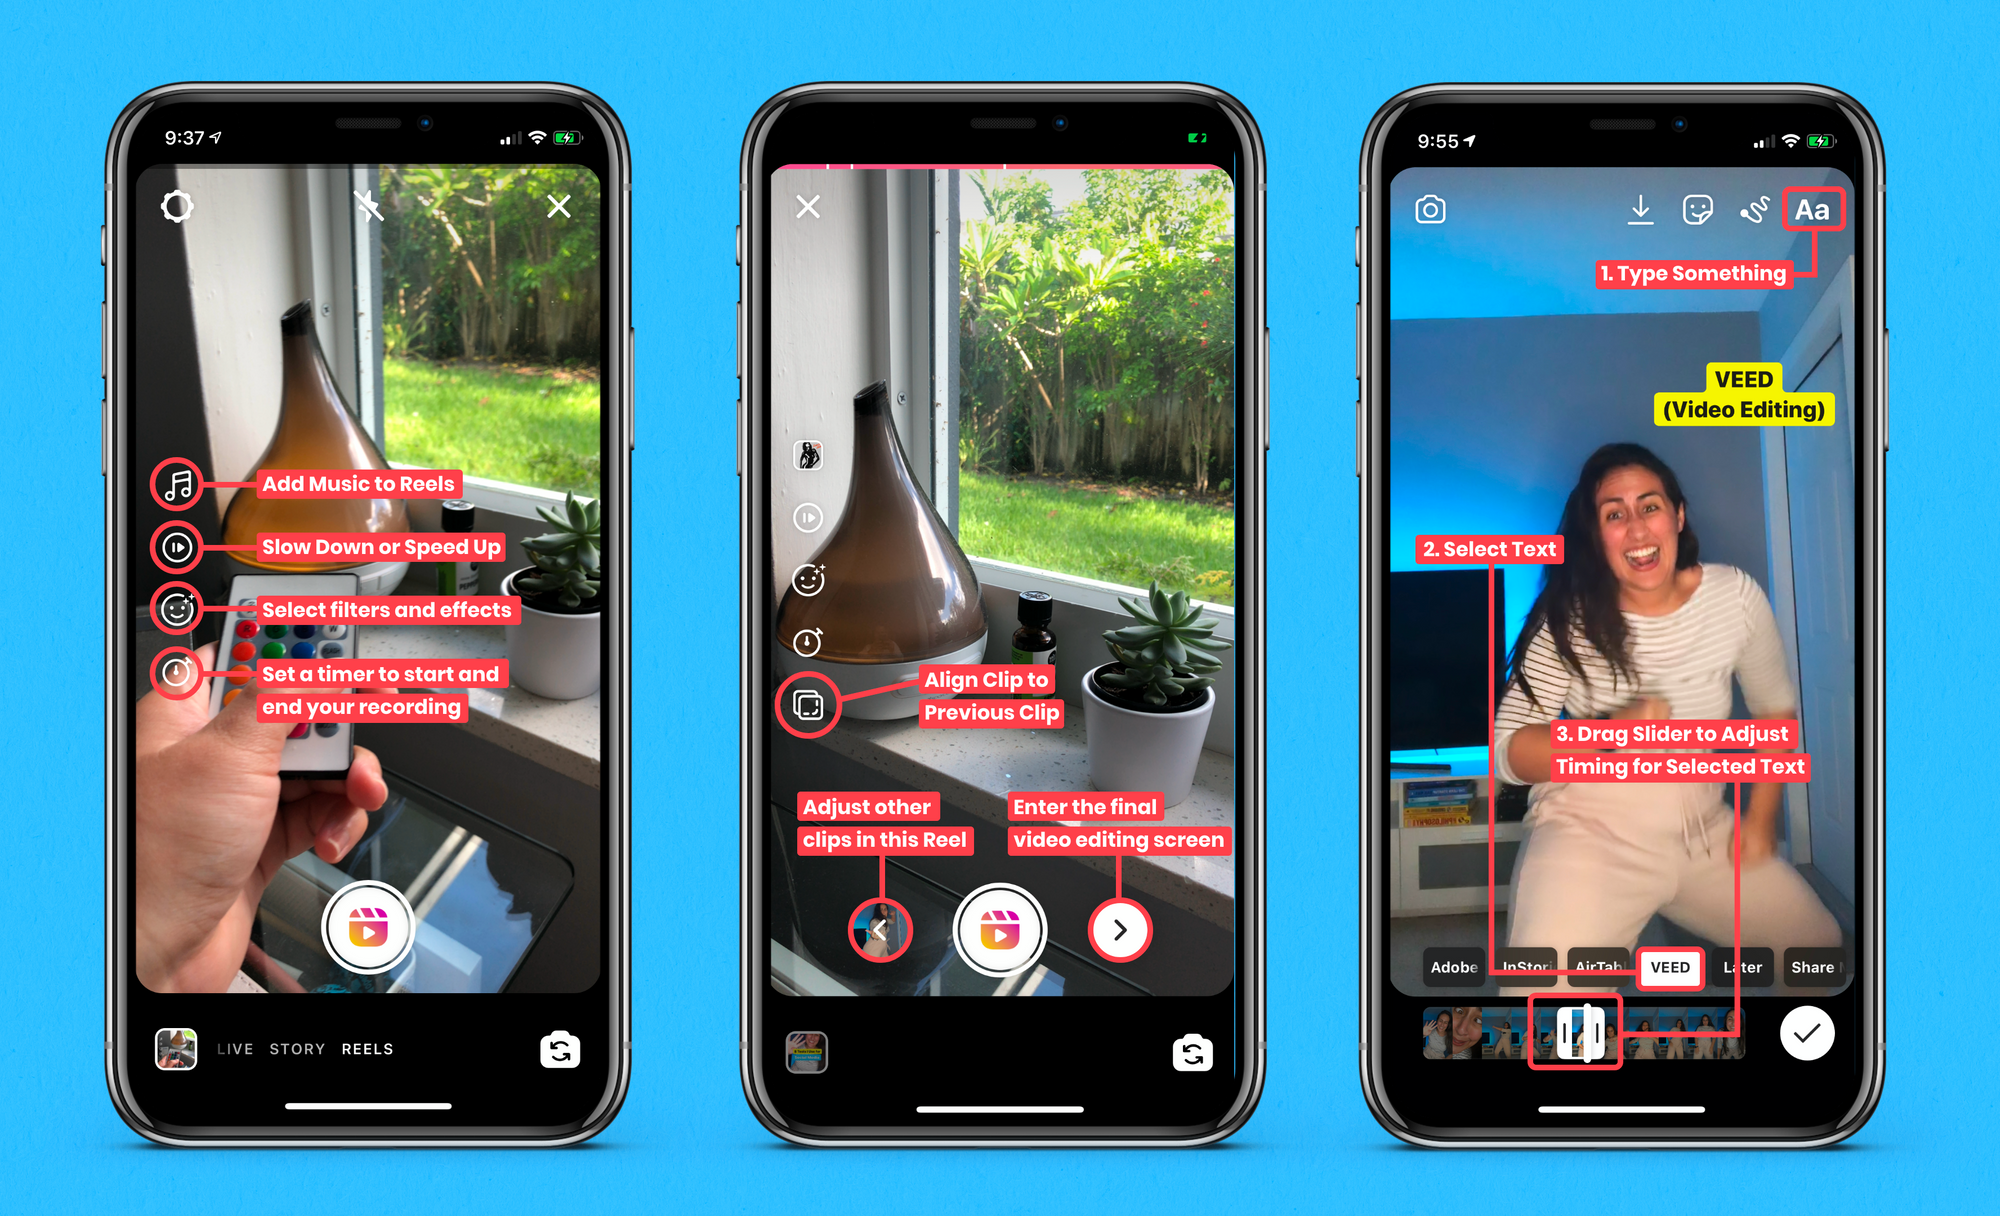
Music Button - Access the music library for your videos
Speed Up or Slow Down Button - make your clip move quicker or slower before recording
Effects Button - View Instagram's library of filters and effects to add to your video.
Timer Button - Set a timer to decide when the video will stop recording for a more hands-free experience. When you click 'record' a 3 second countdown will begin.
Record - start shooting your Reel
Buttons That Appear After Recording 1st Clip
Align Button - appears after you've made one clip making up the 15-sec video. This allows you to line up with the previous video clip. This is especially useful for more advanced transition effects.
Final Editing Screen
Text button - super important. Add text to serve as subtitles for your videos.
Text and Time Stamp Slider - When you type, your text will appear on the bottom right above the video timeline. You can select each text block and adjust the sliders to decide when text will appear.
Stickers - add stickers like GIFs and emojis to your video just like on stories
Draw - You can draw on your video. You can't adjust the timing of it though so what you draw will appear on the full video unless you would rather draw on video with VEED where you can adjust the timing of a drawing.
Save - you can also save your video here. Sometimes this comes in handy if you like to edit most on Reels but add music or effects to the near-finished video elsewhere.
Next - the next arrow takes you to the following screen where you will add your caption, thumbnail, and share to feed.
Publish Screen
When you reach this final screen, you can add a thumbnail like shown above. Either slide the slider to pick a frame OR add from your camera roll. Here you'll also add your caption, hashtags, save as a draft to finish editing later, and then finally publish to your feed.
How to Make Reels
There are so many ways to make Reels. But for the sake of keeping it simple and approachable, I will share how to make a Reel entirely inside the Instagram app and another on how you can do slightly more sophisticated edits outside of the app.
And - of course - if you want more Reels tutorials just shoot us a message or make sure to get on our email newsletter for weekly tips.
What Makes a Good 15-Second Instagram Reel?
Whether you have 15 seconds or 15 minutes - it all comes down to mastering expressing yourself quickly, clearly, and interestingly through storytelling.
Believe me, 15 seconds is enough.
The anatomy of a Reel can be summarized using a basic marketing principle under the acronym AIDA.
A - Attention
I - Interest
D - Desire
A - Action
Let's dive a bit deeper into what each might look like in an Instagram Reel.
Attention: Get People to Stop & WatchIn the first 1-3 seconds of your Reel you just want people to stop scrolling and look at your content. Think about the challenges your target audience faces. What sort of things do they desire?
Using this, you can ask a question touching on a challenge they have that you'll help resolve. Or Make a statement that creates curiosity around something they're interested in.
Example
Want responses to your Instagram story stickers?
Interest and Desire: Provide Context to Retain AttentionNow that you've gotten their attention, it's time to keep it there. Do this by painting a picture with words to provide context.
Example
Here are 3 ways to get REAL answers from REAL people
- Tell a story to provide context
- Add text to video so nobody is excluded
- Then ask a question
Action: Encouraging a Simple Action Through Valuable Content
Example
What's your biggest challenge with stories?
In the end, the structure will look something like this if we merge the examples:
- Clip #1: Want responses to your Instagram story stickers?
- Clip #2: Here are 3 ways to get REAL answers from REAL people
- Clip #3: Tell a story to provide context
- Clip #4: Add text to video so nobody is excluded
- Clip #5: Then ask a question
- Clip #6: What's your biggest challenge with stories?
Now let's go through the step by step on how to make the Reel inside of Instagram.
1. Open Instagram Reels
Remember, this is where you swipe left as if you're going to make a story. And then you click on "Reels" on the bottom right of the bottom slider menu.
2. Choose if you want to add music, effects, or the slow down or slow up effects.

Don't worry if you don't have the music option. We don't have it either yet. We will cover this in the common issues and workarounds section.
If you are making a tutorial requiring you to share a screenshot or pre-made video for a tutorial, you'll love the green screen filter allowing you to upload media while you are still appearing on the screen.
To find a filter, simply scroll to the far right of the effects menu and click on the magnifying glass. Then just type green screen in the search bar to select a green screen.
3. Click the record button on the bottom center.
You can also set the timer button if you want to go hands-free. Do your thing and talk OR you can point to places on the screen on which you'll later overlay some text.
Best Practices:
- Talk in simple short sentences
- Add text overlays to act as subtitles (or edit your Reel with VEED to add real subtitles)
- Make sure you have good lighting like recording by a window or using a simple ring light
Continue recording clips until you're happy
4. Click the 'next' arrow
To move forward to the publishing screen, click on the arrow.
5. Add a Cover Image to Your Instagram Reel

You can slide the slider to select a frame from your video to use as your cover. The easiest way to make this work is to make sure the first 2 seconds of your video are staged to allow for the placement of your cover text.
Or, you can just design a thumbnail with a tool like Canva and upload it. At VEED we're finding this option to be easier lately. We like to take a pic inside Instagram stories, add some text in the center, and save it as our thumbnail.
It's fast and it's easy.
6. Write Your Caption
To be transparent - we're still experimenting with this bit. We'll update it as we learn. But we don't seem to think there is a need for shorter captions like TikTok.
The reason we think this is because on TikTok, the caption is overlaid on the video. The format there doesn't accommodate a large block of text.
But on Reels, you have the text under the video on a clean white background. You might see the caption over the video if you find a video via the Reels feed. But we think people on Instagram are already "trained" to expect longer captions so they will click through to read more. And it supports the 15-second video with more details too.
We encourage you to run a mini test of your own to decide for yourself what works for you. Maybe make 5-8 Reels with short captions and another batch with longer captions. Check about 3 days after posting how well they did overall.
7. Add Hashtags to Instagram Reels
Hashtags are another one we're testing but also think that - unlike TikTok - more hashtags are ok. We're using all 30. But have also seen success with just 3-5 tags on a video.
Just make sure to actually add tags. They're your friend that helps the algorithm better categorize your content to distribute it to potential viewers.
8. Share to Feed
Once you've finished with the above steps, it's time to make sure you share to the feed. Check of the option to do so and publish your Instagram Reel!
9. Then Share Your Reel to Stories
Lastly, go to your Reel and click the airplane icon to share. Share your Reel to Instagram stories and add a couple hashtags to your story (you can hide them behind a text overlay) to boost discoverability.
How to find winning topics to make a Reel from (or repurpose content)
Why make Reels if you have stories that are also 15-seconds long? Well, stories disappear after 24 hours and Reels don't.
Maybe you're scared it'll be like 500X more work. But it doesn't have to be.
The easiest way to begin is by repurposing video content. Go through stories in your highlights, videos in your feed, and TikToks you might've made.
Save the best ones in terms of which got the most engagement. You can use a tool like VEED to slice up the video into a 15-second clip. Simply google Instagram to MP4 converter to paste the URL and export the video. if it's a story, you can download from inside the Instagram app.
Never made a video before?
Go through your most engaging posts and take note on the topics. These are topics worth covering in Reels format.
Check out the competition. What's doing well for them? What do people ask them in their comment sections? Use these as content inspiration.
Or just ask around. Share a story asking people what they want. Reach out to a loyal follower, thank them for following you, and ask them how you can better help with with your content by suggesting a few post topics around areas they have trouble with.
Frequently Asked Questions About Instagram Reels
Instagram Reels are a bit glitchy at the moment. But that doesn't stop us and it doesn't have to stop you either. I asked our email subscribers to ask me anything about Reels and here's what they asked.
Q: "I don't have the music sticker on Reels..."
No problem. You can still make a Reel using other apps. Shameless plug here but VEED is really great for these simple videos. But you can also use some mobile editing apps to edit and import music of your own.
Q: What is the best way to repurpose your IGTV lives/IGTV to a reels format? - Vivi, @theculturedmarketer.reads
Oh my I love this question! Here's the smartest way to go about it.
When you make an IGTV or make go live, there are usually comments from people sharing their favorite takeaways.
Read the comments (or jog your memory to remember what people commented on the live). So - for example - if I make a video about 9 Ways to Repurpose Blog Content and people love tip #7 I'll trim that out.
I'll export the video (look up Instagram to MP4 converters - they're usually free). But also, I keep a copy of the original of every video for easy access to avoid the exporting route ?
Then I use VEED to split up the segment of the video with the favorite takeaway into a 15-second clip. Save, share, and repeat! I actually encourage you to share even the bits of longer videos that didn't do well. Chances are people didn't want to consume it in longer-form video format. But in Reels format it might be engaging!
Don't forget to add subtitles with the text tool in case your original video didn't already have them.
Q: "The text keeps resetting even though I adjusted the timing"
Sometimes you have to fully close and then reopen the app. This worked for us. But for other people, it's a glitch in their app. The best workaround is adding text with another video editing tool.
Remove existing text overlays and click the save icon to save your Reel without any text added over it.
Then, create a new video project with VEED to add text to video or add subtitles to video. You can try it for free and play with the text timestamps.
Q: "My cover photo doesn't stay when I save as a draft"
Same here. Simply have your cover photo ready when you're ready to post. This is the only option for now.
Another option is to schedule Reels using Later's social media scheduler (paid tool).
Although you can't technically schedule Reels (yet) there's a workaround I use since I make so much content and don't want to risk losing it due to a glitch in drafts. I'd literally break down and cry if that happened.
I simply add both the 15-second Reel plus the cover image and schedule it as a multi-photo post on Later. Then, when it's time to post, I get a push notification via the mobile app along with both the video and image sent over to publish.
I then open the instagram app and navigate to Reels. I load the video, paste my caption, and load my cover pic.
Q: "How do you keep your (Instagram Reels) videos professional and on point with our brand while still being interesting enough that people want to watch?"
Social media redefines the perception of professional. What I mean by this is that you don't need a fancy "professional" setup (expensive lights, splurging on a DSLR, green screen backdrop, complex software) to BE and FEEL professional.
Anyone can make a Reel with just their phone, good lighting, and a good idea.
And coming off as professional is all in the way you carry yourself on camera for your target audience. Master the art of storytelling. This is what will make you interesting but also feel more professional as you get better and better at it.
But as far as visuals being on-brand go, here's what I'd suggest. Have a couple go-to filters you use, colors, and Reels fonts you use for your videos always. This will create more visual consistency.
Q: How important is it to add Reels if we were not using TikTok?
If Instagram is your primary social media platform - very important. Honestly, I encourage everyone to do it.
- The organic reach is incredible (more eyeballs on your page)
- Short-form video is on the rise and Reels is a great place to take advantage of this. Instagram stories disappear. Reels don't. You can always repurpose a Reel as a story AND as a TikTok to save time and energy.
Overall, Reels are an amazing opportunity to dive into video content. Remember, not every single effort in your marketing (especially social media) can be summarized with a chart and given a specific dollar amount in terms of ROI.
So if you're concerned about how Instagram Reels will get you more sales - think beyond the immediate gratification. Think about the bigger picture. Money comes and goes but brand building stays.
The more you show up and connect with your audience through Reels and other content forms, the more awareness and trust you're building. You're making your brand more human, more approachable. Because video is what breathes life into a brand online.
Graphics can't replace looking another human being in the eyes through the lens of your camera and connecting with them.
