

We see subtitles almost everyday. Whether it's on Netflix, Browsing through Instagram or on Youtube. But how do you actually create a SubRip Subtitle file?
If you want to know how to make your own SRT file manually or by using tools, this article is for you.
You'll learn how to create your own customised SRT file from scratch so you can add time-stamped captions to your videos, movies or social media content.
What is a SRT file?
SRT stands for SubRip Subtitle. It's a plain text file that contains information about the duration times of a subtitle's text.
One of the most popular places you'll find SRT files online is Youtube. Every time you activate the captions on a Youtube video, you are activating the SRT file linked to that video.
SRT files work on most social media platforms. This allows you to create one SRT file and distribute to different platforms while making sure the subtitles on every video and platform are identical. This avoids you having to use the native subtitle tool of each platform, therefore saving you a bunch of time and hassle.
There's a variety of different techniques and tools you can use to make SubRip Subtitle files for your videos.
How to make a SRT file on your computer?
So now you know what a SRT file is for, the question you might be asking yourself now is how to create one.
Creating a SubRip Subtitle file from scratch is actually very easy to do. All you need is a text editor on your computer. The only thing you need to keep in mind is that it respects the following format.
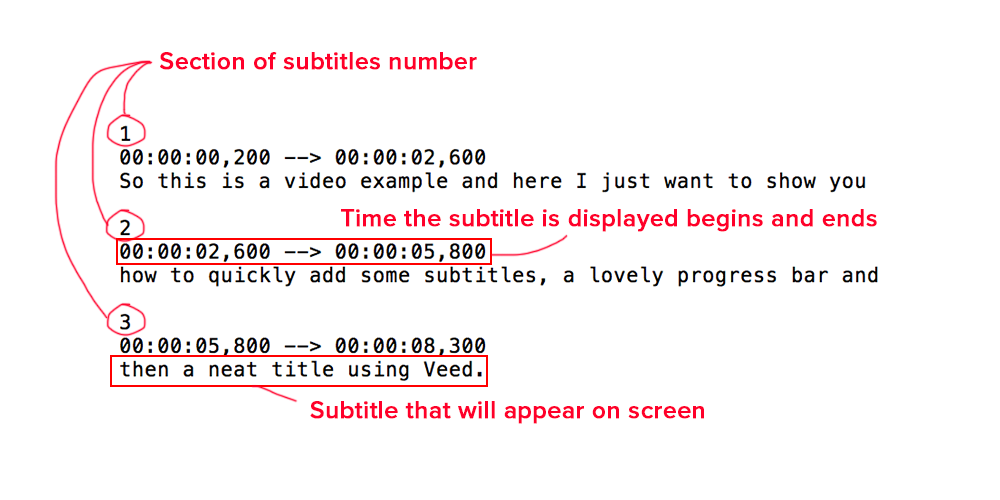
So this is what a SRT file looks like for a 9 second video.
Every numbered section is a portion of text that is displayed on the screen.
Below that are the beginning and ending timestamps of that section, this is how the computer knows exactly at what time to display this specific subtitle section.
And then there's the actual text that will be displayed on the screen for the determined time period of this section.
The most important part is making sure that the timestamps for each subtitle are formatted correctly like this:
[hours]: [minutes]: [seconds], [milliseconds]
So if you look back at the graphic from above, you can see that the first subtitle of the video will begin two hundred milliseconds after the video does. This is because I don't start talking until then. If you were to film a video and didn't say at word for the first two minutes and 59 seconds. Your first subtitle section would start on the third minute so it's timestamp would be 00:03:00,000.
So remember every subtitle needs a section number, a correctly formatted beginning and ending timestamp for each section, and some text to be displayed on screen.
There's no point in creating a section for a time slot if no text needs to be display on the screen at that time. A subtitle doesn't have to begin as one ends.
Once you've written out all of your subtitles. If you used a text editor, once you've saved it just change the document's extension from .txt to .srt.
So now you know how to create a SRT file on you computer, but as you can see this can be a very lengthy process. Most videos that needs subtitles are a lot longer than the 9 second video I used as an example. If you're creating a SRT file for a big project such as a TV episode or a film, you will either need to have an insane work ethic or a tool that can do the work for you and automatically subtitle your video content.
How to automatically create SRT files?
Now you may know how to create a SRT file, but do you know how to create a SRT file fast?
This is exactly what you're about to learn. Instead of having to manually create them we're going to use an in-browser tool called Veed to automatically transcribe the audio of your video into a SubRip Subtitle file.
1. Upload the video that needs subtitles
So the first step to creating your SRT file fast is to go to Veed's website and upload your video. You want to be uploading a video that's in its final form. Because if you happen to make cuts and edit changes to your video, the timestamps of your SRT file will no longer match your video.
To upload your video just click on the New Project button or the Upload Button. If you don't have an account you can create one so your projects will be saved online and you won't lose progress.
2. Click on the Auto Subtitle button
Once your video is uploaded, click on the subtitle tab in the left toolbar.
From here you can click on auto subtitles and then select the language your video is in. This will then automatically transcribe all the audio of your video in to text and place it at all the correct timestamps.

3. Check the grammar and spelling
After your subtitles have been generated, you should check the spelling and grammar. Although the subtitle generator is 99% correct it will occasionally make mistakes when it comes to people's name or other words that it's not to familiar with. Most of the time the only thing you'll have to do is to add a little grammar or change some of the section's timestamps. You can do this by using the SRT editor on the left.

4. Download your SRT file
Once you are happy with the your subtitles, you can now download your SRT file. To do this, while still being in the subtitle tab, click on Options at the top right. Here you will have the choice to either download your subtitles as a .srt file or a .txt file.

And that's it, you've created a SRT file for your video automatically without having to manually type out each line of timecode.
If you want to upload your video with subtitles to Instagram, a platform that doesn't support subtitles, you will need to download the video with the subtitles rendered into the video file. This is a task you can also accomplish easily with Veed.
How to use your SRT files?
Now you have your SubRip Subtitle files, how do you use them correctly?
If you want to check your subtitles work properly to avoid having any issues when uploading them online, you can do so on your desktop by using VLC Media Player.
1. Open your video with VLC
Select your video on your computer, and if your default media player isn't VLC. You will have to right click on your video file in finder and then select "open with..." and then choose VLC Media Player.

2. Add subtitle track to your video
Now your video is playing in VLC, you need to add a subtitle track to that video. To do so click on Subtitles in the top menu bar and then "Add Subtitle File...".

Finder will then open and you will need to select the dedicated SRT file for your video. To make things easier, I like to create folders with my video and its subtitles inside.

3. Proofread your subtitles
Now your subtitles have been added to your video, I highly suggest taking the time to watch your video with its subtitles and make sure there are no mistakes when it comes to spelling and timing of each subtitle.

How to upload SRT files to social media?
Many social media sites such as Twitter, Youtube, LinkedIn and Facebook, all allow their creators to upload video content with Closed Captions.
Because most social media platforms have their video content on autoplay when scrolling through the feed, a lot of users watch videos with the sound off. By adding SRT files to social media videos, your posts will get more engagement and higher viewer retention rates.
SubRip Subtitle files are also great for SEO. When you upload SRT files to a video platform such as Facebook or Youtube, they're indexed by Google and therefore become crawlable. This will greatly help your Youtube video when it comes to ranking on Google and Youtube. And all the keywords in your video's subtitles become searchable, so your Facebook videos will show up in more searches.
So when it comes to adding Closed Caption to your videos on Facebook, it can be done from both your personal account and your Facebook page.
Facebook Page
When posting a video to your Facebook page, you'll be taken through the entire creation process. This is where you'll be able to add your SRT files.

Here you'll want to click on the section titled Subtitles and caption (CC). This is where you have the possibility to upload SRT files to your video. You can add multiple different SRT files for different languages.

When uploading the actual SRT file, you will need to make sure that it's in the right format otherwise you will get the following error message.

So you will most likely have to rename each of your SRT files when uploading to Facebook depending on what language they are in. If I'm uploading SRT files for french Facebook subtitles, my file would have to be named like this.

Facebook Personal Account
Annoyingly, it's a different method when it comes to adding Closed Captions to videos on your personal page.
You first have to upload a video as if you would normally without even thinking about subtitles.

Only once it has been uploaded, you can go to your video post and select edit.

From here you will be taken to a page where you can edit the video's thumbnail, description and subtitles. So just click the choose file button and select your SRT file for that video.

Adding subtitles on LinkedIn videos is a little easier than Facebook.
Once you've selected the video you want to upload, before clicking next, click the edit button in the top right corner.

Here you will be able to select your SRT file and save it to that video post. Unlike on Facebook, with LinkedIn you can only add one SRT file.

Youtube
Youtube is the platform to which SRT files bring the most power. This is because google will recognise the keywords within a video's subtitles. This will help it rank on Youtube and Google.
To upload a SubRip Subtitle file to one of your Youtube videos, first you need to go to your Youtube Creator Studio.

Then click on Subtitles in the left sidebar and choose a video you want to add Closed Captions to.
Then you need to click on the blue Add Language button. Once you've chosen what language your subtitles are in, a new language line will show up, click on Add under the subtitles section.

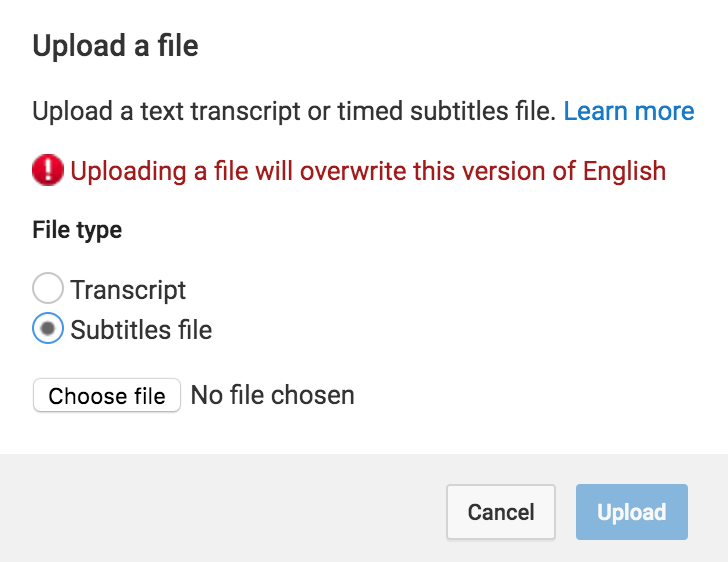
You will then be taken to Youtube's subtitle editor, here click on Upload a file.

Then you can choose what SRT file you want to upload and you're all set.
To add a SRT file to your twitter videos, you need access to Twitter's Media Studio.

However, Media Studio is currently on an invite only basis. So unless you've been invited, you probably won't be able to gain access. So I would suggest trying baked-in subtitles using Veed's Subtitle Editor.
If you do have access. After you've logged into your Twitter account, select a video within your Media Studio library and select the subtitles tab. Choose the language of your subtitles in the drop-down menu. And then click the upload button and add the SRT file from your computer.
Now you know exactly how to create SRT files fast for your social media videos so you have no excuse not to. I hope this article was helpful to you.
If you have any questions, don't hesitate to reach out!
